Back to Home
Loading...
Morgan Hopkins, Customer Success Manager
Last Updated: Feb 1, 2026
The ARRAYFORMULA in Google Sheets™ can be incredibly useful when used in conjunction with Google Forms™.
Each time a form submission is made, Google Forms will store your form response data within Google Sheets. But, in some cases you may need to calculate additional data based on what was entered by your users. For example, your users may enter the cost of items, and you want to calculate the tax or the total cost of those items. You could calculate the sum of two columns with a standard formula like =L2+N2 however it will not be copied down automatically each time a form submission is made. This is where ARRAYFORMULA is useful.
Google Sheets defines an ARRAYFORMULA as enabling the display of values returned from an array formula into multiple rows and/or columns and the use of non-array functions with arrays. In laymans terms, you can perform calculations across a large range of data without ever having to copy and paste the formula. The formula may look intimidating, but don't worry I'll show you an example.
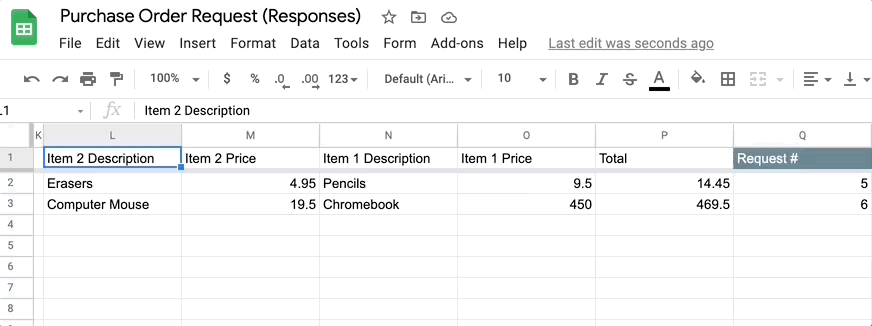
To set up a basic Total field that sums the values in two columns (column L and column N), your array formula would be =ARRAYFORMULA(L2:L+N2:N). For Row 2, this will calculate the sum of L2 and N2. For Row 3, this will calculate the sum of L3 and N3, and so on.
You'll notice however that this leaves a bunch of unwanted zeros for rows without data. To remove the zeros, we can add an IF statement so that it only shows a Total for the rows that contain data. To do this, your array formula becomes =ARRAYFORMULA(IF(L2:L<>"",L2:L+N2:N,"")). With the IF statement, it will first check that the value in Column L is not equal to an empty value (<> means "is not equal to"). So, if it's not an empty value it will sum the two cells, otherwise it will leave it blank.
I'm glad you asked - you absolutely can.
Once you have added the formula column to your spreadsheet, the add-on will automatically start including the data on email notifications.
You can also include the data within the subject of email notifications or your attachment templates by using the column header value between << and >> markers. For example, if you named the column Total, you would use the marker <<Total>>.
In addition, you can also use the calculated field within recipient logic, allowing you to build more advanced logic that defines when a recipient is or isn't included in your workflow.